All great platformers have animated heroes. Even Super Mario, which was released in 1985, used several animations for the player. Why? Because it would look completely unrealistic if Mario just stood frozen in one animation while he runs and jumps around the level. So it makes sense that we should add animations to our player. This will add yet another step of realism to the game.
Try running, jumping, or standing still. See how the player’s animation state reacts:
My art could definitely be improved, but I’ll demonstrate how to create these 3 animations for simplicity’s sake.
The Structure
The most important aspect of giving any game element multiple animation states, is to make sure you structure it correctly. When I first started programming, I tried to put all of the animations on a single timeline, and the resulting structure was too cluttered and complicated that it was difficult to make things work the way I wanted them to. So now I’m sharing with you a simpler method.
Essentially, we are editing the player and creating a single frame (inside his timeline) for each animation state. To switch to that animation, all we need to do is gotoAndStop(“that_frame_name”)
Each frame will contain another movie clip nested inside it, instead of just plain graphics, which will contain a looping animation.
If this sounds confusing, don’t worry. It’s easier to understand by doing it, especially with the ridiculous number of images I’m providing to walk you through.
Creating the Animation States
Alright, let’s do it! First thing you want to do is double-click on your player to edit him. Select everything inside this symbol, and then convert this into a new symbol. I named it “Player Animation Idle“. This will let us nest the animation inside the player that will play when the user isn’t doing anything.

Next, insert a new Keyframe into the timeline of the Player. This Keyframe will contain the animation for when the player is running.

This will create a frame with the exact same contents as frame 1. This won’t work for us, because we have the Player Animation Idle on frame 1, but we need a new movie clip (Player Animation Running) to be on frame 2. There is a pretty quick way to fix this. On frame 2, click on the movie clip. The Properties panel should look like this:

Ignore the instance name. Look at the button labeled: Swap…
If you click on this button, it easily allows you to swap a different symbol into the same location of the selected Movie Clip. We haven’t created the Player Animation Running symbol yet, but there is a solution to that too. In the menu that pops up (pictured below), click the tiny square button below the picture. This is the Duplicate Symbol button. Enter a new name for the new symbol: “Player Animation Running“. Click OK to create this duplicate, and then click OK once more to swap it.

If you check the properties panel, Frame 2 will now contain an instance of Player Animation Running.
The next step is to do the exact same thing for Player Animation Jumping. Insert a 3rd frame.

Swap symbol. Duplicate symbol. Enter the new name: “Player Animation Jumping”. OK. OK.
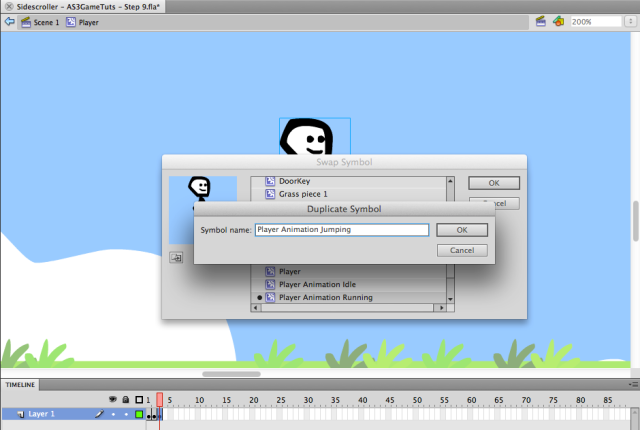
Great! We now have three separate movie clips which we can use to contain the animations! But before we can start animating, there is one small thing left to do, to help with the coding: Frame Labels.
Frame Labels are pretty cool. They let you give your frames specific names. You can use these names to switch to a frame, without even knowing what number it is — this helps make things easier to code. For example, our 2nd frame has the Player Animation Jumping symbol on it. Wouldn’t it be more convenient in our code if we didn’t need to remember exactly which frame this was on? (It isn’t too big of a deal for us because we only have 3 animation states, but if your player had 15 different animations it would be tricky to keep track of things.)
If we give Frame 2 the label “jumping“, then we can switch to it using the code: player.gotoAndStop(“jumping”).
Adding labels isn’t difficult. Create a new layer in the player timeline, which you can name “labels”. Then click on Frame 1 of this layer. This will allow you to edit the Frame’s properties inside the Properties panel.
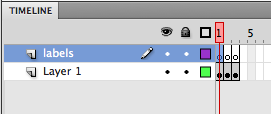
Frame 1 contains the idle animation, so type “idle” into the Name field of the Label section.

Now do that with the other two frames. Click on Frame 2, and name it “running”.

Click on Frame 3, and name it “jumping”.

Done! Time to animate.
Go back to Frame 1, and double-click on the Player Animation Idle on the stage to edit it. Your screen should look like this:

If you know how to animate, then don’t let me hold you back! Create any kind of animation inside this Movie Clip object. All I did was create a Motion Tween, and I used the Transform Tool to create a looping animation by stretching the player back and forth. To create a Motion Tween, select everything, and then right-click. Select the top option: Create Motion Tween. A warning will probably pop up. Just click OK.

A bunch of blue frames will pop up on your timeline. This will automatically create transitions between any specific frames that you edit (move it’s position, scale it up or down, rotate it, etc). If you’ve never used Tweens before, and are looking for more information than I provide, there are many popular guides online to help you, such as: http://tv.adobe.com/watch/learn-flash-professional-cs4/getting-started-13-creating-motion-tweens/ or http://www.adobe.com/devnet/flash/learning_guide/animation/part06.html
You are free to do whatever you want, but here’s what I did:
- I made my tween 20 frames long.
- I added a keyframe to frame 5, 10, 15, and to frame 20.
- I used the transform tool to skew the object slightly to the left on frame 5.
- I used the transform tool to scale the object slightly shorter on frame 10.
- I used the transform tool to skew the object slightly to the right on frame 15.
- I left frame 15 exactly the same as frame 1, so that I will create a smooth, looping animation.
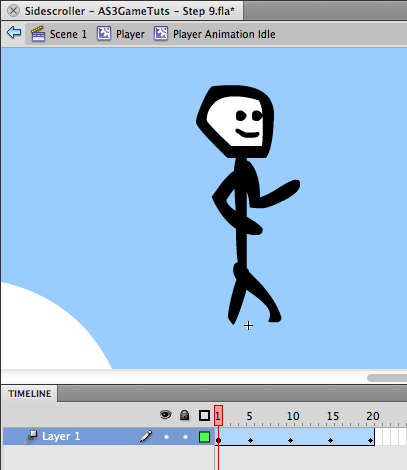
And the resulting animation looks like this:
You can use the same method to create animations for running and jumping. Just make sure you edit the correct symbol.
Go back to the main Player symbol, and this time go to frame 2. Double click on the Player Animation Running object to edit it. I decided to just make my player’s arms go back and forth as he runs. I didn’t even bother with animating the legs, because it can be pretty tricky to make that look realistic if you don’t know how to do it.
I started by selecting the arms on either side of the body, and dragging them off to the sides. We’re going to use another Motion Tween on these individually, so they each need to be their own symbol. It looks messy right now, but I’m going to clean up the art afterwards.
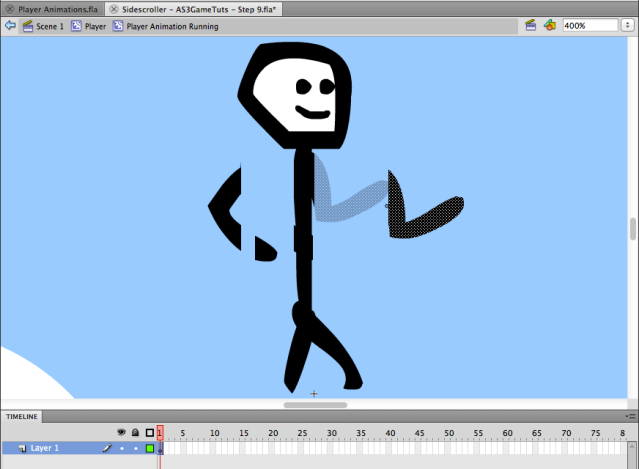
You can use the brush, the eraser, or select tool to edit and reshape the arms into something nicer. Then select each of them individually and convert hem to Movie Clips. The name doesn’t really matter — we aren’t coding with them, just using them to Tween.
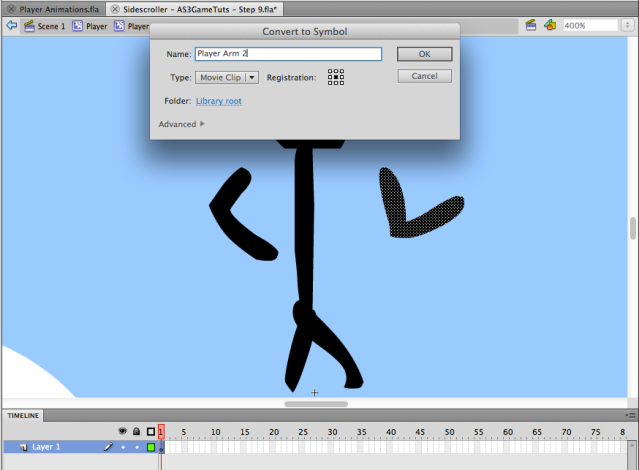
If you right-click on them one at a time, you can create a motion tween. Add extra frames to the layer which the body remains on, so that each layer has the same number of frames. Then use the your skills with the transform tool to move and rotate the arms in a semi-realistic running motion.

(You can see in the above image that the animation covers 30 frames. Our project is running at 30 frames per second, so this is a 1 second animation. If you want to speed things up, just remove frames from the end of the animation, and adjust your art accordingly.)
And the resulting animation looks like this:
I decided not even to use an animation for the jump — I used a single still-image to represent the jump. In a professional game, this probably wouldn’t be good enough, but this is just a test character, so it doesn’t matter. Go to Frame 3 of the Player, and edit the Player Animation Jumping symbol. I just selected the bottom half of his body, and dragged it up a little bit to shorten him.
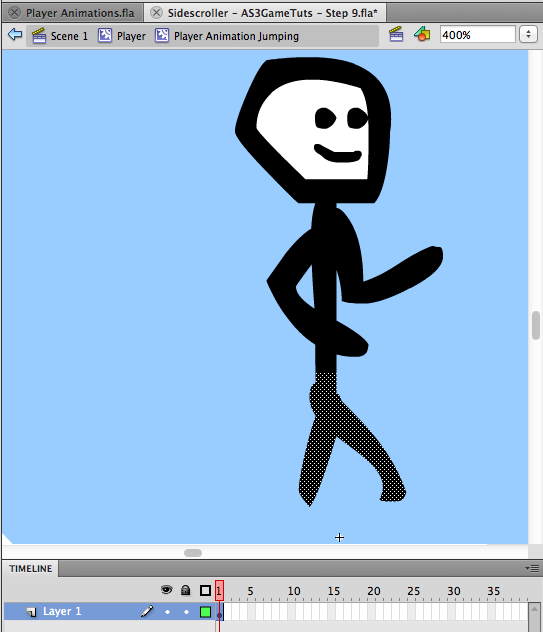
The art is done!
Adding the Code
Once again, now that the art is done we can move on to integrating it with the code. Let’s outline what we want to accomplish:
- Make sure that the current frame of the player is always stopped on whatever animation-state the player is in.
- If the player is on the ground, not moving, set the animation state to “idle”
- If the player is on the ground, and is moving left or right, set the animation state to “running”
- If the player is in the air, set the animation state to “jumping”
var animationState:String = "idle";
This variable will let us update the player’s animation automatically just by using the line of code, gotoAndStop(animationState);
We want to continuously check if the animationState has changed, so its only natural that we should add some code to the main loop function. We can figure out which animation is currently playing by accessing the currentLabel property of the player. This will give us the name which we set as the label earlier in the tutorial. So if the player is currently stopped on Frame 1, tracing player.currentLabel will output: “idle”.
If the player’s currentLabel matches up with our variable, the animationState, we’ll know that the correct animation is playing. But if they don’t equal one another, we need to gotoAndStop(animationState). Add the following lines of actionscript 3 into the very bottom of the main loop function:
if(player.currentLabel != animationState){
     player.gotoAndStop(animationState);
}
Cool! The only thing left is to set the animationState to the correct name at the correct time. To do so, create a new conditional right above the last lines of code we added.
It’s logic time! When do we want to play the “running” animation?
Starting with a mental outline of the task:
- The player needs to be on the ground
- Which means downBumping must be true
- AND The player needs to be moving
- Which means either the right arrow key is pressed (rightPressed is true)
- OR the left arrow key is pressed (leftPressed is true)
- OR the player is sliding — slowing down from friction
- Which means even if the keys aren’t pressed, if the xSpeed is great enough the player is still running
- The xSpeed can either be greater than the speedConstant (if the player is running to the right)
- Or the xSpeed can be less than the opposite of the speedConstant (if the player is running to the left)
downBumping is true AND one of the following is true: rightPressed is true OR leftPressed is true OR the xSpeed is greater than the speedConstant OR the xSpeed is less than the opposite of the speedConstant
if( ( leftPressed || rightPressed || xSpeed > speedConstant || xSpeed < speedConstant *-1 ) && downBumping){
     animationState = "running";
}
This is a pretty good mental exercise for breaking down complex tasks into simpler ones. If you ever get stuck trying to figure out logic in your game, try to run through these steps.
That’s all set for the running animation. If you test your game and start to move, the player should start looping through that animation. But we haven’t set any other animations yet, so he’ll never stop. We can fix this by adding an else if statement to the end of the conditional. The rest of the conditional is simple. If the player isn’t running, then he will be “idle” if he is touching the ground. Otherwise he must be “jumping”.
The complete conditional should look like this:
if( ( leftPressed || rightPressed || xSpeed > speedConstant || xSpeed < speedConstant *-1 ) && downBumping){
     animationState = "running";
} else if(downBumping){
     animationState = "idle";
} else {
     animationState = "jumping";
}
Test it out! Everything should work!

Awesome tutorial as always bro!! Maybe next one you can show how to add shooting or adding enemies. Thanks again for the tutorials!
Thanks for the feedback — I might do that tutorial next!
great tutorials as ever Ben.
Thanks!
timers, inventory, and shooting are three things id still like to see and the hit points sry 4 lol
Thanks for letting me know. I’ve decided to cover shooting next.
It would be good to get enemies next level, maybe shooting for one after, but for now just enemies is fine
Sounds good. Many people have requested enemies/shooting, so I guess that’s a winner.
Great tutorials; they are a lot better than anything else I can find online for free. In the next tutorial or a mini lesson, could you explain how to implement a start screen and an end screen to the game?
Good idea — I probably should have done one of those already… I’ll try to get around to doing it fairly soon.
Also, after you do enemies, it would be good to put in a title screen where people could start the game and learn the controls.
Sounds like a plan. I’ll try to do that pretty soon.
Thank you so much for all this help, but could you make a Title Screen next please? It’s something I keep trying to do but my coding is wrong each time.
How far along are you on the next part? I’m anxiously awaiting for it, keep up the good work!
The next tutorial is almost done — I’ll try to finish it in the next couple days. Sorry to keep you waiting, I’ve been busy finishing up school for the year, but now that I’m done I should be able to get more tutorials out.
[…] start screens, end screens, credits page, pre loader bar. Credit to some of the actionscript to Ben Reynolds. This entry was posted in Uncategorized by Eric F.. Bookmark the […]
hi, you’re tutorials have been so amazing thank you somuch for them!!
just a question, how would you include an animation for shooting? and make the bullet come out after the animation plays? so my char lifting his arm and then firing a bullet. :D
thanks
Hi there! First of all, say thanks again for sharing your knowledge and work!
Now, I am trying to make one more animationState for shutting. I have the animation inside the player in a new frame with the label “shutting” just like “running” or “jumping” etc.. but I can’t get the code to work when space bar is pressed… if someone can just write the script for that would be much appreciated. Thanks in advanace!
Sorry and also I’d like to do an animation for (running+shutting) and (jumping+shutting) what code would I need to do that after I have the frames setup with their labels.. Thanks again!
Hello, I am loving these tutorials, but I have run into an issue, it may be me being really blind though, How do i get the player to look left (flip the animation) when I press left and look right if I press right :(?
It’s the script for this function I am having trouble finding :(.
If(leftPressed){
xSpeed-=speedConstant;
player.scaleX=-1; // add this to face player left
//same with the rightPressed but it will be a positive 1.
My player is stuck in the “jumping” frame it seems. When I move left or right, the “running” does not play, and when standing still, the “idle” does not play. Any ideas?
I think I’m having the same issue. Did you come to a solution?
First off I just want to say thank you, thank you, thank you! I have been re-typing all your code out by hand to do my best to understand it as much as possible, and I’m enjoying every line of it! At this moment though i’m having trouble with my animations.. here is my issue…is this section of code…..
if((leftPressed || rightPressed|| xSpeed > speedConstant || xSpeed < speedConstant *-1) && downBumping){
animationState= "running";
} else if(downBumping){
animationState= "idle";
} else {
animationState= "jumping";
}
if I enter "running" in the stop that "jumping" is at, then when test it my character will constantly be looping my running animation. I cannot get the animation to run in the appropriate spot or even in the place where idle goes. all my directions are bumping according to the output and my left & rightPressed are working as well. I've looked over my code several times and cant find any errors(thought I know there must be)
suggestions? Thanks
the first line of code isn’t chopped like that, its all on one line like it should be. srry miss type
Please can you write how to play jump animation only if I press upArrow?
I mean when player is falling I would like to show stand animation, not jump?
Please
Hello sir this tutorial helped me a lot can I ask your permission to used this tutorial as a reference?
Definitely, yes. I’m glad it helped you! :-)
Awesome tutorial! Can you do a toturial about attacking with sword, adding equipments and inventory? :-)
I have everything put in right for the character to stand idle, run, and jump to the animations, but it’s not playing correctly. my character stands in midair and flashes between all 3 frames, and the only error I get is Scene 1, Layer ‘actions’, Frame 1, Line 371 1084: Syntax error: expecting rightbrace before end of program.
what am I missing? the error doesn’t take me to any specific line, either
You forgot to write right brace, or you deleted right brace accidentally. Just check out where you missing a brace.
So Ben why you didnt write this requested in last post?
How to make “standing” animation if player is falling, and how to make jumping animation only if player press upKey and he is in air??
Sorry for my english if it is not good.
If anyone needs to play jumping animation only when player press upKey and not when player is falling off from platform without pressing it….here is the code:
Create private var jumpTriggered:Boolean;
When upKey is pressed set jumpTriggered = true;
When your character hit ground set jumpTriggered = false;
Now change your code to this:
if ( ( leftKey || rightKey) && player.onGround)
{
animationState = “running”;
}
else if (player.onGround)
{
animationState = “idle”;
}
else if (jumpTrigered)
{
animationState = “jumping”;
}
else
{
animationState = “idle;
}
Hi, I would like to ask how will I use 2D sprites for my character. Thanks
Hi It’s a great tutorial. Thank you. I added animation on frame 4 so my character will kneel when pressing the down arrow, but I don’t know the appropriate code for that. What do I add on top of the original one? Thank you!
Alrighty, well I have the jump,idle and walk all working fine. But I also have an attack animation, and want it to play when I press on the Down arrow key and I want it to play the animation all the way through even after I let go of the key. But as soon as I let go of the key it goes right back to the idle state. Which I know happens because character is supposed to automatically go to the idle state if the downBumping is true. is there a way to make it play the animation all the way though and override the downBumping?